The Weekly Calendar button on the Executive Dashboard opens a calendar view of your classes by week. This is your class command center and allows you to manage almost all areas of your classes from one screen!
You'll also have access to the Weekly Calendar using the Calendar link above the blue menu bar on every other screen in your database.
Note: The Weekly Calendar is for internal use only, it is not available to your families.

The Weekly Calendar opens in a new window and displays a week long calendar of classes. While the Weekly Calendar is most easily accessed from the Executive Dashboard, you can also navigate to this calendar from the Class menu > Search report and also from the Class menu > Weekly/Daily Calendar. Other calendar/schedule views, such as a monthly or by room, are also available. These are discussed in more detail in our Help article Class Calendars and Schedules.
The Weekly Calendar and other calendar options (daily, monthly, and room) only include your class offerings. At this time your Events are NOT included. They are maintained on the Event Calendar Views.
Weekly Calendar Features

- Calendar display settings / Criteria allow you to customize your calendar view.
When first opened your Weekly Calendar will bring up the current week's schedule with no criteria selected (no filters applied, all classes showing). Use the Prev and Next buttons, or the date field, to change the week you are viewing.
The currently selected criteria is displayed. Use the Change Criteria button to edit those selections.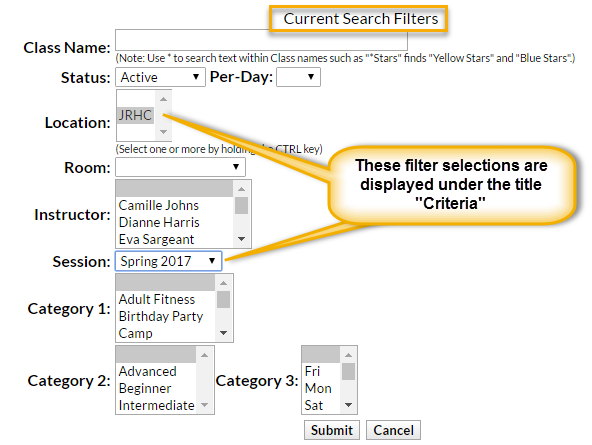 Use the Add Class button to quickly add a class on the fly! You can also add a class into a specific time slot. See feature #5.
Click the Settings button to change the time range that your calendar displays. Set this to your facility's opening and closing time.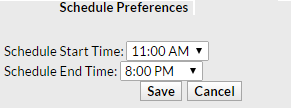 Select Show Students to add the scheduled students' names to the class information that displays when you rest your mouse pointer over the class on the calendar (hover without clicking). See feature #6 for more information on that class information window.
 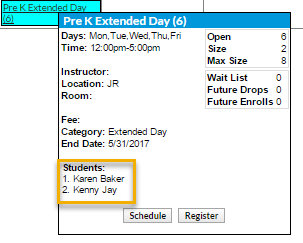 The Show Full Classes checkbox defaults to checked to display full classes as well as classes with openings. Clear the checkbox to hide classes that are full which makes it easier to find a class with an opening to enroll a student in.
 - Click the link for any date to look at the daily view. The display criteria you have selected will also be applied to that daily view. For more information on the daily view see our Help article Class Calendars and Schedules.
- See summary information for each class on the calendar at a glance. Click the link for quick access to the class record. Note: The class record opens in the main Jackrabbit window and may be hidden behind the Weekly Calendar window; drag the Weekly Calendar window until you can see the main window.
 Class name
Number of openings (#)
Number of future drops #FD
Number of future enrolls #FE - Accurate enrollment counts are displayed in real time! A full class (0) that has a future drop scheduled for the following week will accurately reflect that opening (1) when you advance the Weekly Calendar to that date.
- Double click into any open time slot to add a class. The Add Class window will open with the start date and time for the slot that you clicked into pre-selected; these values can be edited. You can also use the Add Class button in the critiera / settings section which will open the Add Class window with no pre-selections made.
- Hold your mouse pointer over a class (hover) to open a window with a window with a summary of class information including openings, future drops and enrolls, absences, and more. To include the names of all enrolled students click the Show Students checkbox in the criteria/settings area.
 Click the link for any of Future Drops, Future Enrolls, or Absences to open a window with more detail including student names. Click the Enroll button to enroll an existing student into the class or click the Register button to open the Quick Registration Form to add a new family and enroll a student in the class. If the class is full you will see CLASS FULL and a Waitlist button, click to add a student to the class waitlist. Once the waitlist is also full the button will drop off and you will only see CLASS FULL.
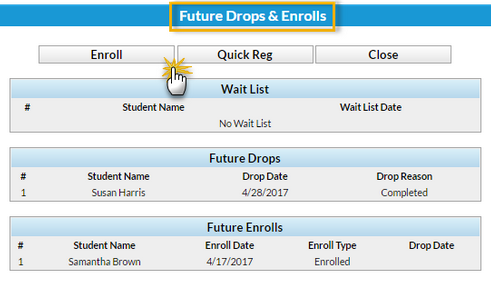
- Classes can display color coded by Category 1 if you have assigned colors to your Category 1 drop-down values in the Drop-Down List Editor (Tools menu). When darker colors are chosen the text display will change to white.
This makes it very easy to distinguish between the different types of classes you offer!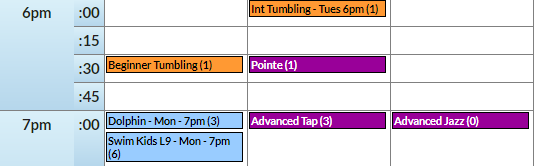
 Use the Add Class button to quickly add a class on the fly! You can also add a class into a specific time slot. See feature #5.
 Select Show Students to add the scheduled students' names to the class information that displays when you rest your mouse pointer over the class on the calendar (hover without clicking). See feature #6 for more information on that class information window.
  The Show Full Classes checkbox defaults to checked to display full classes as well as classes with openings. Clear the checkbox to hide classes that are full which makes it easier to find a class with an opening to enroll a student in.
 Class name
 Click the link for any of Future Drops, Future Enrolls, or Absences to open a window with more detail including student names. Click the Enroll button to enroll an existing student into the class or click the Register button to open the Quick Registration Form to add a new family and enroll a student in the class. If the class is full you will see CLASS FULL and a Waitlist button, click to add a student to the class waitlist. Once the waitlist is also full the button will drop off and you will only see CLASS FULL.
