We recommend you review Link to Your Online Event Help Center article before moving forward with these additional filter options for your Online Event Calendar.
The Online Event Calendar shows your customers, at a glance, what events are happening at your site. You can use calendar codes to filter and display different information. The default settings for calendar codes are Status = Open, Unavailable, and Notice.
If you want a Calendar to display a different Status, you can do that. If you have multiple Locations, you may want to show a separate Calendar for each Location - you can do that too! If you have several different Category 1's (Cat1) (for different Event Types), you can also show a Calendar for each one. This is called filtering and tells the Calendar to only display a certain Status, Location, Cat1, or etype (Event Type).
The examples below show parameters that must be added at the end of the Event Calendar URL after the OrgID to limit the items shown on your calendar.
Only ONE etype can be used at a time if you want to filter by etype. However, the Cat1 and Loc filters can be combined into the same code.
| Filter by | Sample Code |
| Location (Loc) | Add to end of code: &loc=(your loc code) |
| Sample hyperlink: https://app.jackrabbitclass.com/eventcalendar.asp?orgid=9209&loc=JRT | |
| Category 1 (Cat1) | Add to end of code: &cat1=(your cat1 code) |
| Sample hyperlink: https://app.jackrabbitclass.com/eventcalendar.asp?orgid=9209&cat1=Parties | |
| Status | Add to end of code: &status=(Status) |
| Sample hyperlink: https://app.jackrabbitclass.com/eventcalendar.asp?orgid=9209&status=Notice | |
| Date | Add to end of code: &date=(mm/dd/yyyy) |
| Sample hyperlink: http://app.jackrabbitclass.com/eventcalendar.asp?orgid=9209&date=04/01/2014 Note: The date filter will only pull the month and year for the calendar. | |
| Event Type (etype) | Add to end of code: &etype=(your event type ID) |
| Sample hyperlink: https://app.jackrabbitclass.com/eventcalendar.asp?orgid=9209&etype=12345 |
Create Calendar Header Text
If you decide to filter by Event Type (etype), the last option in the table above, you have the ability to add a custom Calendar Header . This ONLY applies when the online calendar is being filtered by etype.
You will find this setting in the Events menu. Go to Events > List Event Types (click on the Event Type) > Summary (tab) and enter the information for the Header Text.
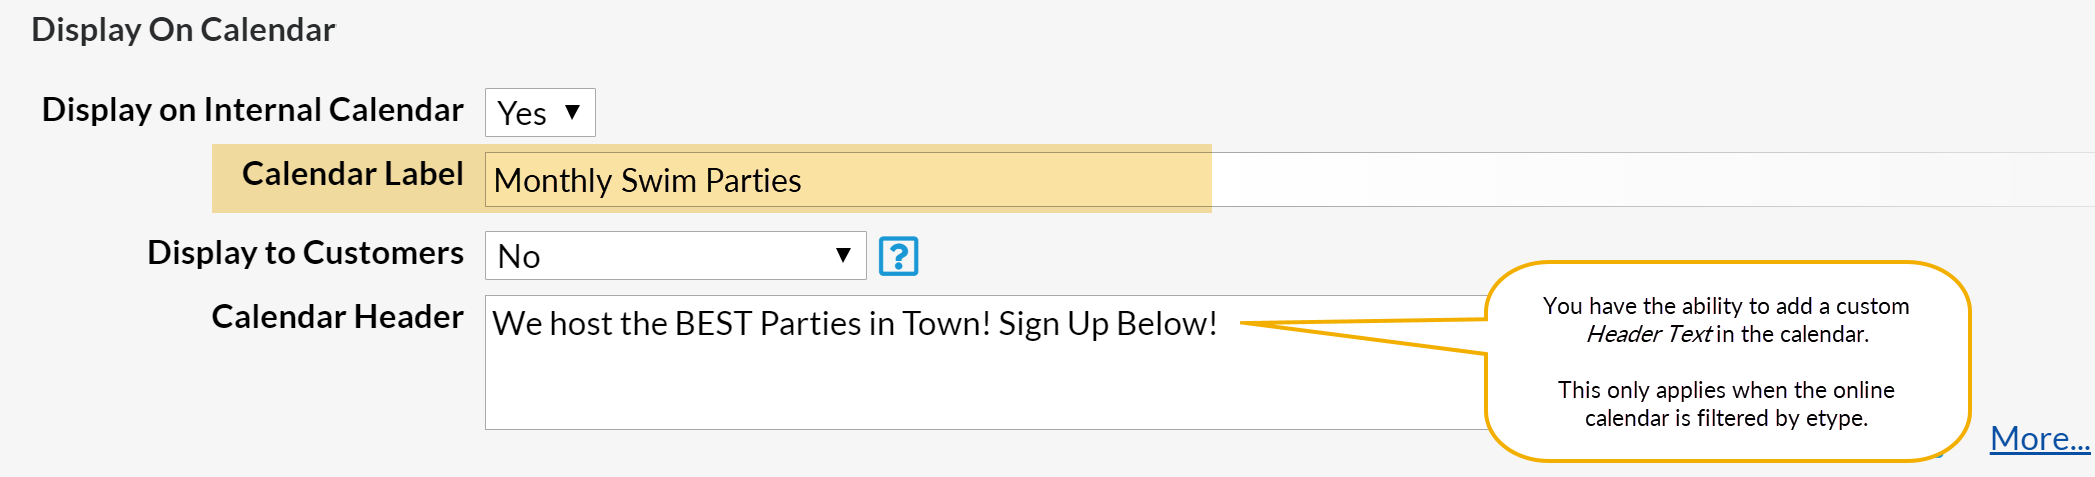
The Calendar Label and Calendar Header text will show at the top of the Calendar online when filtered by etype for this Event.
Check out our Help Center article, Link Directly to a Specific Event (Bypass the Calendar) when you want to promote a single event. You can create a link to register for an event and use it on your website or send out an email announcement.