Jackrabbit offers the ability to collect charitable donations from your families via the parent portal, and allows them to have control over the amount they would like to donate to the charity that you partner with.
Watch this short video for an overview of the Charitable Donations feature in Jackrabbit.
Getting Set Up to Accept Donations
Donations in Jackrabbit are managed using the Store module and the Parent Portal. Follow these steps to get Jackrabbit set up to accept charitable donations.
Step 1 - Create a vendor for the charity
Once a vendor is defined as a charity, it will be added to the drop-down list in the Accepting Donations Parent Portal setting (see Step 4 below). The charity selected from that drop-down list is added to the ♥ Give page in the Parent Portal.
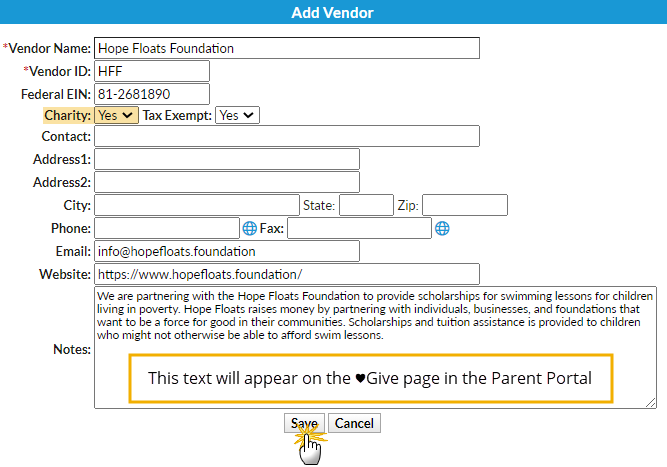
- Go to Store (menu) > Item Vendors and click Add Vendor.
- Enter the charity's name as the Vendor Name and create a Vendor ID.
- Enter the charity's tax identification number, set the Charity drop-down to Yes, and select whether or not the charity is Tax Exempt.
- Complete the contact and address information.
- Optionally, add Notes. The text entered here will display on the ♥ Give page in the Parent Portal.
- Save.

Step 2 - Create a Transaction Type for donations
The Transaction Type appears in several places (on the Transactions tab of the Family record, in the transaction history in the Parent Portal, etc.) and helps to identify donation transactions.
- Go to Tools (menu) > Edit Settings > Drop-down Lists (left menu). Scroll down to the Transaction section and select Transaction Type.
- Click Add Row, add the label for the transaction, e.g., "Donation", and select Debit.
- Save Changes.

Step 3 - Add items for each donation amount
Items created with a Category 1 = Charitable Donations, and a Vendor that has been designated as a charity (Step 1), will be added to the ♥ Give page in the Parent Portal. For each item, a button displays labelled "Give #" where the # is the Item Price. Parents will select a button for the amount of donation they want to make.
Note: The Charitable Donations CAT1 value is added automatically by Jackrabbit and is a reserved value (can't be edited/deleted).
- Go to Store (menu) > Items and click Add Item.
- Create an Item #/Barcode for the donation.
- Add an Item Name; this appears as a note on itemized receipts, statements, and on the Transactions tab of the Family record.
- Because this is a non-inventory item, set Track Qty on Hand to No. Optionally add a Description and a Status for the donation item.
- Add the Item Price; this is the amount that will display in the Parent Portal, on the ♥ Give page. Set Item Tax to No Tax.
- Select Charitable Donations from the Category 1 drop-down. Select the Transaction Type added in Step 2 and optionally add a Transaction Sub-Type.
- Select the charity for the donation from the Vendor drop-down and Save Changes.

Step 4 - Enable donations in the Parent Portal settings
When Accepting Donations is set to Yes, the selected charity will be added to the ♥ Give page in the Parent Portal.
- Go to Tools (menu) > Parent Portal > Settings (tab).
- Scroll down to the Accepting Donations section.
- Set Would you like to accept donations on behalf of a charity? to Yes.
- From the Select charity drop-down list; choose the charity to be added to the ♥ Give page in the Parent Portal.

The Donation Process in the Parent Portal
Once you have completed the setup above, your families will see the ♥Give option in their Parent Portal.
|  |
Immediate payment by credit card is required when a donation is made in the Parent Portal. | |
|  |
|  |
|  |
Reporting for Charitable Donations
The Paid Fees report can be generated to either include or exclude charitable donations using the Display Setting Show Charitable Donations.
In the body of the report, donations are clearly identified, and the report's totals are broken out to distinguish between donations accepted and your revenue. This makes it easy to reconcile with your Deposit Slip report for the same period, which will always show the total amount of payments collected.
