With Jackrabbit's Resources feature you can upload files and add links to the Family, Student, Class, and Staff records where they are stored on the Resources tab.
- No more files full of paper...scan documents, then upload and store them in the record they relate to.
- Resources added to a Class record can be shared with parents in the Parent Portal.
- Limit access to sensitive documents to only those Users with the required permissions.
| l | Add a Resource | l | Add a Class Resource | l | Manage Resources |

Setting the right permissions for your Users is very important! Review the User Permissions for Jackrabbit Resources.
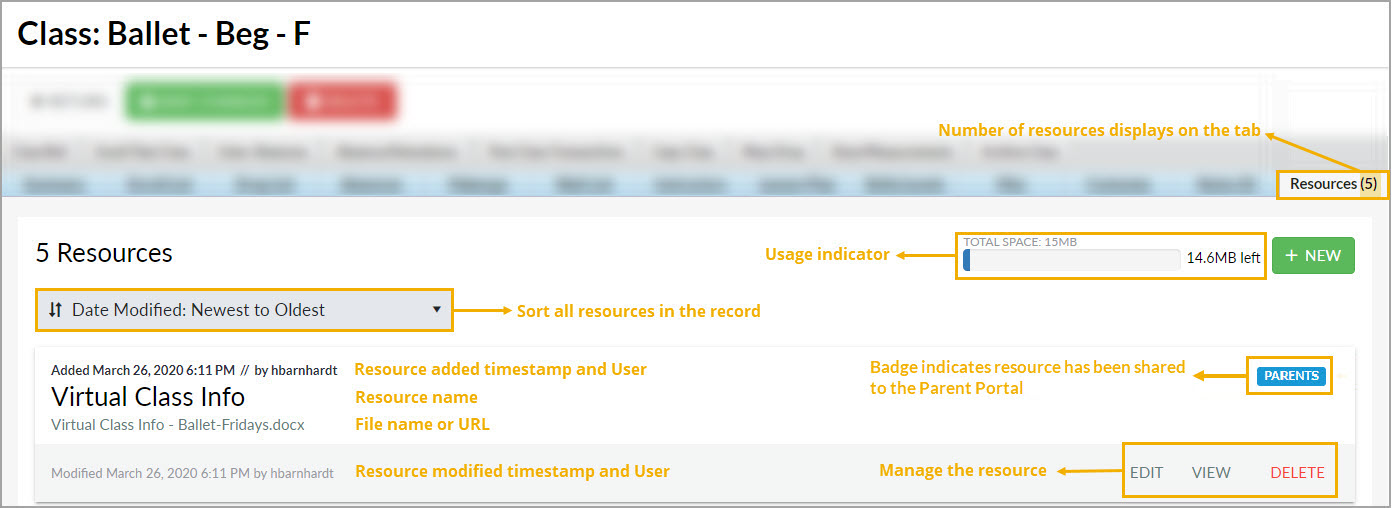
The Resources Tab
Each Family, Student, Class, and Staff record has a Resources tab where you can upload files and add links (URLs). For example, in the Class record, add a link to a Google Doc with instructions and video links for a virtual class that you have created.
- The Resources tab in each record shows the number of resources that have been added, e.g., Resources (5).
- Each of the records (Family, Student, Class, and Staff) can store up to 15MB of data. Usage is displayed in a progress bar and available space is counted down.
- Sort the resources by date created or modified, or alphabetically by resource title or filename.
- Each resource card displays the date created timestamp, the User who added the resource, the name you have given the resource, the file name or URL, and the time/date and name of User to last modify the resource.
- A badge will display to indicate a restricted resource
 . Note: The card for a restricted resource will not display to Users who don't have the View Restricted Files User permission.
 - In the Class record, the card for a resource that has been shared to the Parent Portal will display a badge to indicate it has been published.

- Each resource is managed (edited, viewed, or deleted) using the links in each individual resource card.

Add a Resource in a Family, Student, or Staff Record
- Use the
 button on the Resources tab to open the Add a resource modal.
 - Add a name for the resource. This name will appear in the resource card on the Resources tab.
- Enable Is this a restricted resource? if the resource should be restricted to specific users. Restrict access to the resource if it involves confidential or sensitive information. Only Jackrabbit Users with the View Restricted Files User permission will be able to see a restricted resource on the Resources tab.
- Select the Resource location:
- I'll upload it - When you opt to upload the resource, you'll use the Select files... button to locate the file on your computer. Accepted file types include the following:
.doc .pdf .jpg .txt .xls .jpeg .odt .rtf .html .epub .png .mp3 .mp4 .csv .eml .docx .xlsx .tex .wks .wps .wpd - I'll link to it - When you opt to link to the resource, enter the URL in the Resource Link field, e.g., a link to a YouTube video or a file you have stored in DropBox etc.
- I'll upload it - When you opt to upload the resource, you'll use the Select files... button to locate the file on your computer. Accepted file types include the following:
- Click ADD. The resource has been added to the record.
 button on the Resources tab to open the Add a resource modal.
Add a New Resource in a Class Record
- Use thebutton on the Resources tab to open the Add a resource modal.
- Add a name for the resource. This name will appear in the resource card on the Resources tab.
- Class record resources published to the Parent Portal will appear as a View Resources link in the Class card.
- Select the Audience. If you want parents and staff to see the resource you are adding, click both to enable.
Is this a resource for parents?
Resources for parents are displayed in the Parent Portal.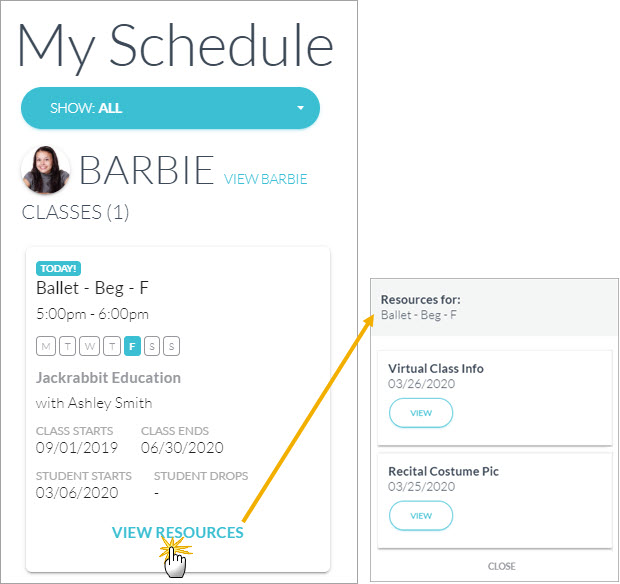
- Enable Is this a restricted resource? if the resource should be restricted to specific users. Restrict access to the resource if it involves confidential or sensitive information. When restricted, only Jackrabbit Users with the View Restricted Files User permission will be able to see the resource. Note: If the file is restricted, the resource will not be viewable in Parent Portal.
- Select the Resource location:
- I'll upload it - When you opt to upload the resource, you'll use the Select files... button to locate the file on your computer. Accepted file types include the following:
.doc .pdf .jpg .txt .xls .jpeg .odt .rtf .html .epub .png .mp3 .mp4 .csv .eml .docx .xlsx .tex .wks .wps .wpd - I'll link to it - When you opt to link to the resource, enter the URL in the Resource Link field, e.g., a link to a YouTube video or a file you have stored in DropBox etc.
- I'll upload it - When you opt to upload the resource, you'll use the Select files... button to locate the file on your computer. Accepted file types include the following:
- Click ADD. The resource has been added to the record.

Review Jackrabbit's Terms of Use. Uploading a file confirms you have agreed and that you have consent to possess the resource you are uploading.
Manage Resources (Edit, View, Delete)
Edit a Resource
From the resource card, click the Edit link to open the Edit resource modal. Here you can edit the resource name, change your audience settings, and either replace the current file (if resource was an uploaded file) or change the resource location to a link and vice versa. Note: there can only be one or the other, it is not possible to have both a file uploaded AND a link in the same resource record.
View a Resource
Use the View link in a resource card to access the resource. Depending on the type of resource it is, it will either download to your computer or open in a new tab. If it is a resource on the Class record, and you have published it to the Parent Portal, it can be viewed in the same way, a download or a new tab in their browser.
Delete a Resource
To completely remove a resource from the record, use the Delete link in the resource card. You will be asked to confirm that you want to delete the resource.
The resource card will update the Modified timestamp and User information to reflect any changes made.