Watch a (2:14) video tutorial on Adding Items to the Store
Do you have existing inventory that you'd like Jackrabbit to import into your database? You can import items via Tools > Import Data. After the import spreadsheet is completed, you can import the data yourself from the same Import Data page or contact imports@jackrabbittech.com so Jackrabbit can do this for you.
To add items, go to Store > Add Items. The following information is required for all items added:
- Item #/Barcode
- Item Name
- Item Price
- Item Tax Rate
- Category 1 (Only required if Require Cat1=Yes in Tools > Edit Settings)
- Transaction Type
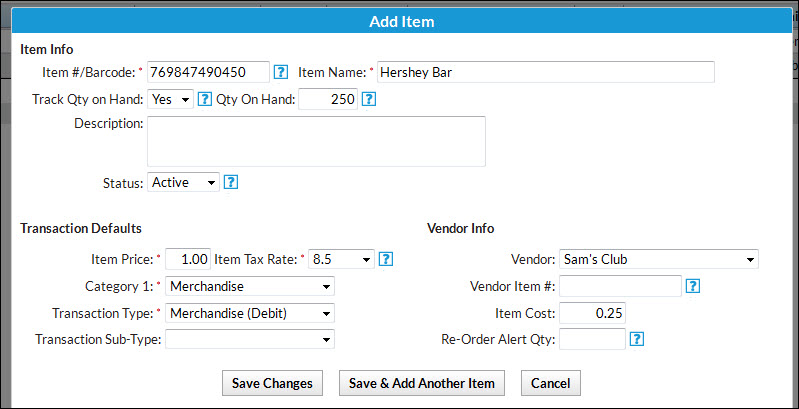
Item #/Barcode
Jackrabbit recommends you start by entering the Item #/Barcode. The Item # can be numbers, letters, or a combination of both (15 character maximum). An item can be entered manually or can be inputted with a Barcode Scanner. If using a Barcode Scanner, put the cursor in the Item #/Barcode box and scan the item's barcode.
Jackrabbit recommends that each Item # be unique, however, allowing duplicated Item #'s does provide flexibility.
- You might have one Item # for an item that comes in various colors and sizes. The Item might be created multiple times with the same Item # but each description and price might be different. Example: A sweatshirt has the same Item #/Barcode but comes in both Child & Adult sizes with different pricing. Create the Item #/Barcode twice and include the size in the Item #. Add a description (Sweatshirt - Child / Sweatshirt -Adult) and the correct price.
- If the same items are sold at different locations, you can create the Item multiple times with a different description and price as needed. Example: Water bottles have the same Item #/Barcode at all locations. Use the same Item # but enter the location in the Description to differentiate between items (Water Bottle - Loc A, Water Bottle - Loc B, etc.). This will assist you in tracking inventory by location.
If you do utilize duplicate Item #'s, keep in mind that it is VERY important that the correct item is selected when posting a fee in order to maintain inventory count accuracy.
Item Name
Enter a Name for the item.
Track Qty on Hand
This field allows for inventory management for an item. When set to No, Qty on Hand andRe-Order Alert Qty are hidden, and the item will not appear on the Dashboard Alert or report for Re-Order Alert Qty. (See Re-Order Alert Quantity Report.)
Qty On Hand
Enter the number of items in physical inventory. Enter the beginning quantity for each item. Every time an item is sold, the Qty on Hand will be reduced. Anytime new inventory is received, edit the item (Store > List Items > Click the Item name) and increase the Qty on Hand. Whenever an item is returned, the returned quantity of the item will be added back to Qty on Hand.
Description
Enter a description if applicable.
Status
A Store Item can be active or inactive. Change items you are no longer selling to be Inactive. This will exclude them from the Search/Select Item screen when making a sale and will also exclude them from the Executive Dashboard Alert Items at or below Re-Order Alert Qty.
Item Price
Enter the price your customers will pay for this item (without tax).
Item Tax Rate
Select the appropriate tax rate from the drop down list.
Category 1, Transaction Type, Transaction SubType
Select as applicable.
Vendor / Vendor Item #
Select a vendor from the drop down list. The vendor item # is typically the number or code used by the vendor to identify the item and is useful when placing orders.
Item Cost
Enter your cost for the item.
Re-Order Alert Qty
This field assists with inventory management. When the quantity on hand reaches this number, it’s time to order more of the item. For example, if you want to order more logo t-shirts when there are 10 left (quantity on hand). The re-order alert quantity would be 10.
Use the Save & Add Another button to continue adding items.