Jackrabbit has designed the Web Registration form so you can easily control and edit it from within Jackrabbit. Any changes you make and save are immediately seen on the form.
Our one-page form is mobile-friendly and YOU control what is shown and required.
Add your company logo to personalize your registration form. See Organization Logo for more information.
Set your Time Zone and Date Settings to ensure the system will date and time stamp the registrations accurately.
The settings below will help you customize your Web Registration form. Initial set up of the form will take approximately 15 to 60 minutes.
This is the first of three pages you will need to set up. The other pages are Field Options/Labels and Agreement Text (Legalese).
Go to Tools > Online Web Registration > Settings to complete the Web Registration form settings.
General Settings
Click the Preview Registration Form button to see exactly what your customers will see. You can even fill out the form and complete an actual registration to step through the process!

| Header Text | Text entered here will appear at the top of your Web Registration form. The Header Text box supports basic html and has a 500 character maximum. |
| Ability to enroll in Class | Select Yes, to allow families to enroll their students into classes or No, to hide this option. |
| Scheduling Options | If you select the ability to enroll in a class, select one of the following scheduling options: |
| Class Instructions | Text entered here will appear right above the Select Class section in the Web Registration form. Class Instructions can be formatted as rich text including options for formatting and styling, and HTML is supported. In addition, you can copy/paste directly from a Microsoft Word document into this section. |
| Google Tracking ID | If you use Google Analytics this is where you will add your Google Tracking ID so that each Reg form "hit" is counted. |
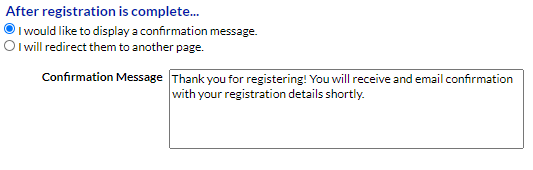
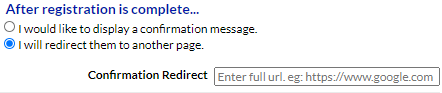
| Confirmation Message or Confirmation Redirect | Select which option to show your users once registration is complete:
|
Email Confirmation Settings
Enter text and make selections for information to be included in the email confirmation once registration is complete.

| Email Confirmation Text | This text will appear in the email confirmation that the customer receives. This box supports basic html and has a character limit of 2,000. |
| Show Instructor | Do you want the class instructor's name to be included in the class details on the customer's email confirmation? |
| Notification Emails | Where do want your organization's copy of the confirmation to be sent? |
| Location Emails | If you have multiple locations you can default the confirmation to go to each Loc's specific email (as set up under your Locations). |
Tuition Fee Settings
If your database is set for Class Based Billing, you have the option to automatically post the tuition fees when a NEW family submits an Online Web Registration Form.
- If Post Tuition Fees is set to Yes, the full tuition amount will post when a student enrolls in a class.

- When General Settings > Scheduling Options is set to Do Not Auto-Enroll - By Request Only, or put on a waitlist, no tuition fees are posted.

Registration Fee Settings
Make selections for how to address registration fees, if any, in this section.

| Post Registration Fee(s) | Would you like Jackrabbit to automatically post a Registration Fee (such as an annual or session fee) onto the family account? This setting impacts only NEW customers registering (creating an account) for the first time. Managing Annual Fees for your existing customers is handled via Post Annual Fees. |
| Post When | Select one of the following:
|
| Post Fee Per | Choose whether to charge the fee per Family, per Student, or per Student each Class. Set the price(s) and set a maximum if needed. |
| Registration Fee | Enter the amount to be posted, for either per family, per student, or per student per class, when a family registers online as a new customer. |
| Transaction Type Transaction SubType Transaction Note | Choose how you want the fee recorded (your Transactions are set up under Tools > Edit Drop Down Lists). |
| Category 1 | Assign a Category 1 value for proper revenue reporting - generally you would use Cat1 = Registration Fee. |
| Use 1st Class Session | This is primarily used when you have concurrent sessions available for Registration. This value only works when you Post Fees PER STUDENT. This setting determines that instead of the Session Value (above), the Session Value of the FIRST class that is registered for is used. If YES, you must have Post Fee set to STUDENT. This means that when someone registers, the Session value on the Class Page (and registered for) will determine the session value marked on the Registration Fee(s) posted. The First Registration determines the same value for any subsequent registrations. If you use this feature and your Fees are set to post per FAMILY then the default Session value (above) is used. |
| Session | Most organizations leave this blank so the current session is used. Assign a consistent Session value that will be on all posted transactions if desired. |
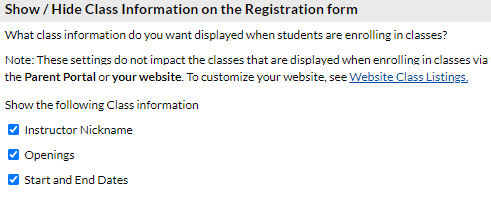
Show/Hide Class Information
Would you like to hide certain class information in the Class Search on your Online Web Registration form? Select the checkboxes for the information you would like to show:
- Instructor nickname
- Openings
- Start and end dates

Class Search Settings: Waitlists and Filters
Select how you want to handle classes this includes waitlists, future drops and enrolls, gender, age, and categories.

| Allow Waitlist When Class Full | If the class is full, do you want to allow students to be able to put themselves on the waitlist? This will also provide a Waitlist link in Portal and Web Reg Class Search results. |
| What impacts the number of Class Openings? | Do you want Waitlisted students to affect the number of openings available for online enrollment? Set each as you wish. Online Registration pertains to class Registration Form, Parent Portal, and Class Listings tables. Quick Registration pertains to your staff use inside the database under Families > Quick Registration/Add Family. Use the question mark icon for a pop up example and explanation. |
| Apply Gender Filter | The gender filter can be used if gender is assigned on the class page. This will remove classes that a registering student does not meet gender requirements for from the list of classes available. If the Organization Default for Hide Gender is set to YES, this filter will not display in the settings. |
| Apply Age Filter | Use the Age filter to limit the class search results to only show classes that the student is within the age range. Class MUST have both a Minimum and a Maximum Age assigned in years and months. A class may also have a Cutoff Date. If a Cutoff Date is listed, the student's eligibility for the class is determined by their age on the Cutoff Date. If no Cutoff Date is assigned for the class, the Class Start Date is used to calculate the student's age. For example, if the Class Start Date is today or in the past, today's age of the student is used to calculate eligibility. If the Class Start Date is in the future, the student's age on the Class Start Date is used to calculate eligibility. |
| Category Labels | Use this section to re-name your Category Codes to a descriptive, meaningful label applicable to your Category designations. |
If you want to hide specific information in the class search page, see our Help article Modify the Class Search Page in the Web Registration Form for details on hiding columns.
Class Listings Tables on your Website
Choose if you would like to show Class Listings Tables on your website.
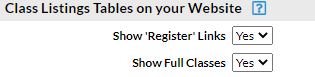
| Show Register Links | If YES, the left-most column will contain direct links to the Registration form. If NO, the class data is still shown but there are no links for enrollment. |
| Show Full Classes | Set to YES if you want classes that have no openings available to show in the Class Listings Table. |
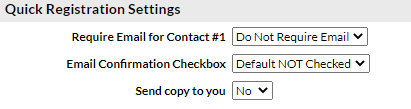
Quick Registration Settings
These settings affect the Quick Registration that is used internally (Families > Quick Registration/Add Family). This controls whether you want emails sent after each Quick Registration and whether you want to require contact #1's email address (recommended).